Most businesses – especially those that offer services, monthly subscriptions, and online tools normally require meetings to seal a deal or explain to users how the product/service work – and there are times that scheduling meetings can get tricky. Here is a quick overview of how you can add an online appointment scheduling feature on your site using different tools
A good and reliable scheduling tool is an important factor in knowing what will work best for your business’s needs.
When choosing a scheduling tool for your website, there are several key factors to consider:
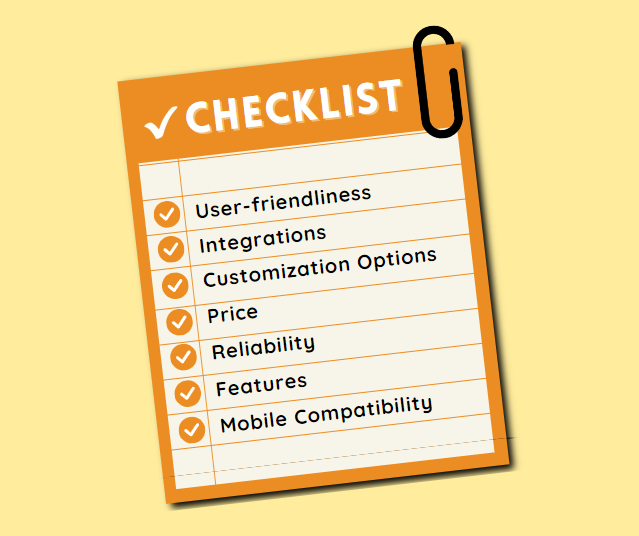
- User-friendliness: Look for a scheduling tool that is easy to set up and use. It should have a simple interface and clear instructions for getting started.
- Integrations: Consider the integrations available with the scheduling tool. Make sure it can integrate with your website, calendar, and other tools you use.
- Customization options: Check if the scheduling tool provides customization options, such as the ability to add branding elements, change the look and feel of the widget, or set appointment types and policies.
- Price: Determine how much you’re willing to spend on a scheduling tool and compare the prices of different options. Some scheduling tools offer a free basic version, while others require a monthly or annual subscription.
- Reliability: Make sure the scheduling tool is reliable and can handle a large volume of appointments. Consider the uptime and customer support provided by the scheduling tool.
- Features: Evaluate the features available in the scheduling tool, such as appointment reminders, integration with your calendar, and reporting capabilities.
- Mobile compatibility: Check if the scheduling tool is compatible with mobile devices and offers a responsive design for optimal user experience on all devices.
Here are a few tools that we can recommend for you to use:
- Calendly is a popular online appointment-scheduling software that allows individuals and businesses to schedule appointments with their customers, clients, or colleagues. With Calendly, you can easily set your availability, specify appointment types, and create a custom page for booking appointments.
- Calendly integrates with a variety of calendar platforms, such as Google Calendar, Office 365, and Apple Calendar, to automatically update your schedule and prevent double bookings.
- Calendly also offers a range of customization options, including the ability to add branding elements, specify cancellation policies, and send automatic reminders to attendees.
- Calendly is user-friendly and can help simplify the scheduling process, saving time and reducing the risk of scheduling conflicts.
- Zapier is an online automation platform that allows you to connect different web applications and automate repetitive tasks. While Zapier is not specifically designed as a scheduling tool, it can be used to help schedule appointments and manage your schedule.
- For example, you can use Zapier to automatically create calendar events in Google Calendar or another platform when a new appointment is scheduled through a form on your website.
- Zapier can also send reminders or notifications to you or your customers before the appointment, ensuring that everyone is on the same page.
After coming to a decision as to which platform you’ll use, both Calendly and Zapier will walk you through the process of incorporating their services into your website.
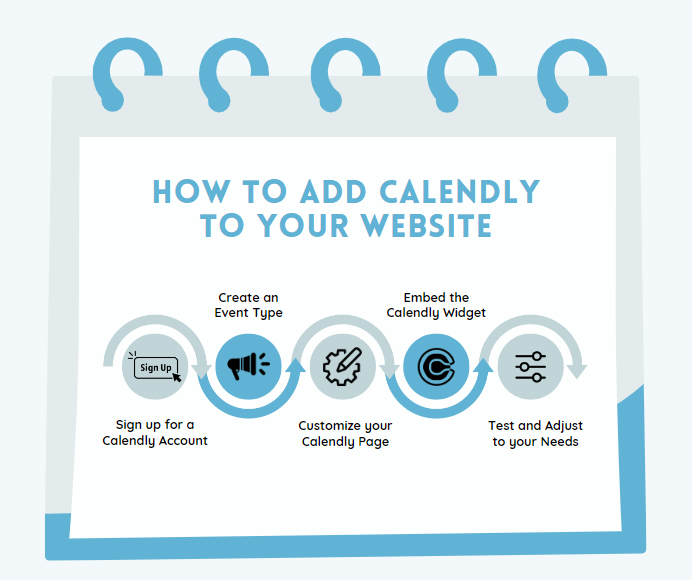
To add Calendly online appointment scheduling to your website, you can follow these steps:
- Sign up for a Calendly account: Go to the Calendly website and sign up for a free or paid account, depending on your needs.
- Create an event type: In Calendly, create an “event type” for the type of appointment you want to offer, such as a consultation or meeting. Set the duration, availability, and any necessary details for booking an appointment.
- Customize your Calendly page: Customize the look and feel of your Calendly page, including the background, colors, and language. You can also add a logo and other branding elements to make it look like your own.
- Embed the Calendly widget on your website: Calendly provides a widget that you can embed on your website. To do this, simply copy the code provided by Calendly and paste it into the HTML of your website. The widget will then appear on your site and allow visitors to book appointments.
- Test and adjust: Test your Calendly integration to make sure everything is working as expected. You can also make any necessary adjustments to the widget’s appearance or behavior from the Calendly settings.
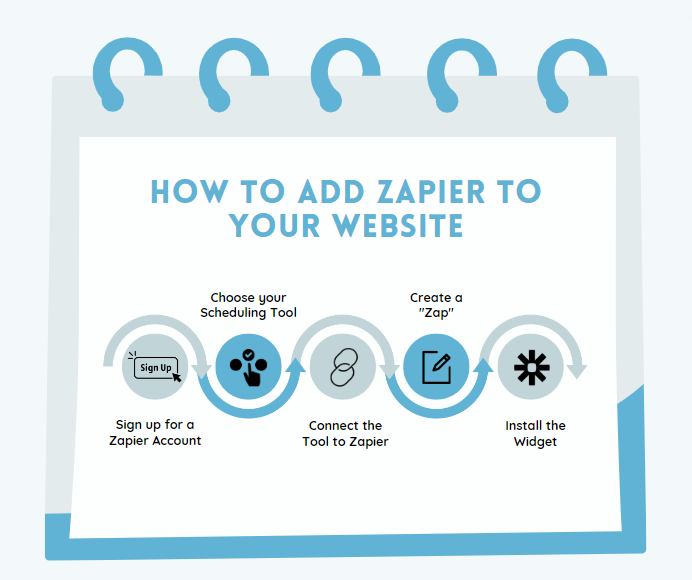
To add Zapier online appointment scheduling to your site, you can follow these steps:
- Sign up for Zapier: Visit Zapier.com and create an account.
- Choose a scheduling tool: Choose a scheduling tool that you want to use for your appointments. Zapier integrates with a number of scheduling tools, such as Google Calendar, Calendly, and Acuity Scheduling.
- Connect the scheduling tool to Zapier: Connect your chosen scheduling tool to Zapier. This allows Zapier to access and manage your appointment data.
- Create a Zap: A Zap is a pre-built automation that connects two apps together. Create a Zap that connects your website form to the scheduling tool, so that every time someone submits a request for an appointment through your website, it automatically creates an appointment in your scheduling tool.
- Install the Zapier widget on your website: Once the Zap is set up, you can install the Zapier widget on your website. This allows visitors to your site to easily request appointments, which will be automatically added to your scheduling tool.