Step 1: Create A Mailing List
The first step is going to be a bit of prep work: Creating your mailing list in MailChimp. If you already have the mailing list in place that you plan on using, feel free to skip this test. For everyone else, let’s get into it!
After you’ve created/logged into your MailChimp account, you should see a page that looks like the image below (minus the “Example List”). From here, you’re going to click Create List in the top right. This will walk you through the process of creating your list.

After your list is created, you need to create a way for people to subscribe to it. The best way to do this is through an embedded form. An embedded form is just a pre-created bit of code. This code will create your typical online subscription form, which looks like a pair of text boxes asking for a person’s name and email.
To get the code for this form, click on the list you just created. From there, you’ll see a screen that looks like the image below:

Any of these options will give you a subscription form, but the simplest choice is Embedded Forms. Selecting this option will provide you with a bit of HTML code, which you can copy and paste onto your site wherever you like. And voilà! You now have a mailing list and a way for people to join that list on your site.
Step 2: Create Your Zap
Now that you have your MailChimp mailing list in place, and you have a Salesforce account ready to go, you’re all set to start creating your Zap. If you’ve never used Zapier before, your “Zaps” are just the automations you create. On the home page of Zapier, you should see a form that looks like this:

In the first field – Connect This App – you’re going to input MailChimp, and in the second field – with this one! – you’re going to input Salesforce. You’ll do this simply by typing the name of each app in the appropriate fields and clicking on them when they pop up. When you’re done, it should look like this:
You can leave the When This Happens… and then do this! fields blank for now, and just click Make a Zap!
Step 3: Create Your MailChimp Trigger
Now that you’ve created your Zap, it’s time to make it do something! After making the Zap, you should find yourself at this page:

You’ll notice that on the left side of the page are two boxes, Trigger and Action. The Trigger is whatever you want to make your Action happen. In our case, that’s a new subscriber. Click New Subscriber and select Continue.
The next step is where you connect your MailChimp account to your Zapier account. If you’ve already used MailChimp with Zapier, you should see that your account is already selected. If this is the case, you can simply select Continue.
If you’ve never used MailChimp with Zapier, you’ll choose Connect an Account. This will take you to a MailChimp login page, and all you have to do from here is login, enter any verification codes, and accept any pop-ups. Once you’re finished, you can go back to Zapier, select your now connected account, and Continue to the next step.
The next step will ask you to choose a MailChimp list. At this point, you’ll click your MailChimp list from the drop-down menu and hit Continue. Zapier will then bring you to the following step:

If your list already has subscribers, then you can choose to Pull in Samples. All this will do is use random subscribers from your list to fill out the next couple of forms with. This doesn’t mean that the subscriber it chooses will be affected in any way, it’s only there to make filling out the forms easier. If you don’t have any subscribers, or you’d rather use fake subscribers that Zapier creates, just click Skip This Step. If you skip the step, you’ll see something like this:

Subscriber A is just a fake subscriber made up by Zapier that we’re about to use in the next step. Just click Continue With Default Sample.
Step 4: Create Your Salesforce Action
Okay, so just to recap everything that’s happened so far: First, we created our MailChimp list and integrated it with our website. This allows people to join our mailing list. Then, we made a new Zap on Zapier that connects your MailChimp account to your Salesforce account. For our trigger (the event that puts your Zap into action) we chose New Subscriber. This means that anytime you get a new subscriber, this Zap will do its thing. And now, we’re going to tell Zapier what that thing is.

You should be looking at the above screen. Since we told Zapier that we wanted to use Salesforce when we created the Zap, it should be the first choice of Action App. If it isn’t there, you can easily search for it and select it in the search box. Once you’ve chosen Salesforce, scroll down and Continue.
Next, Zapier will ask you which action you would like to perform. In our case, that would be Create Lead. Choose this option and Continue.

Just like with MailChimp, Zapier is going to need to connect to your Salesforce account. Select Connect an Account and Continue to the next step once you’re all set.
Now the moment we’ve all been waiting for: Creating your new Salesforce Lead. The page you’re looking at now should be a bunch of empty boxes asking you to fill in information. The only boxes you have to fill in are Last Name and Company.

These boxes – and any others you choose to fill in – will determine what the created Lead looks like every time you gain a subscriber. If you wanted, you could fill in “Jim” in every field, and every time you gained a subscriber, you’d get another Lead on Salesforce named Jim Jim, Jim Ltd. However, we’re going to opt for something a little more useful.
In the first box, Last Name, you’re going to pull the last name from MailChimp and fill it into the box. To do this, click the button on the right of the Last Name box. This will give you a drop-down menu like the one below:
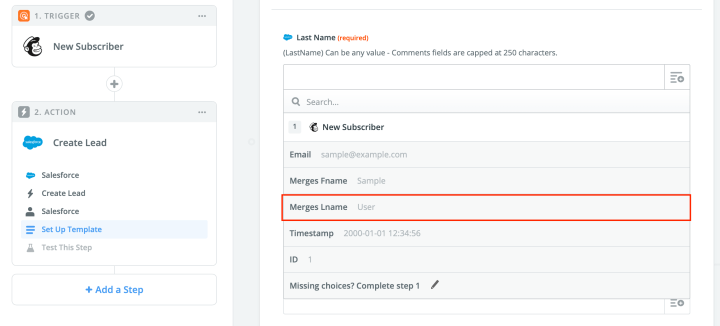
You’re going to select Merges Lname, which just means that whatever the last name of your new subscriber is will be filled into this box. Salesforce also requires that you enter a Company for any new Leads. This creates an issue, though, since you won’t know what company a person belongs to just from their email subscription. So instead, you can fill in this box with anything that associates the Lead with this Zap – that way you know where the Lead came from. To do this, simply type something along the lines of, “MailChimp Subscriber” or “Zapier Lead” into the Company box.
You technically don’t have to fill anything else out for this section, and the majority of it is information that you won’t have unless you interact with a Lead more. However, there are a few boxes you can fill in, just so that you have a little more than a last name for your Lead. If you scroll down a bit, you’ll see a box labeled Email. For this field, you can choose the drop-down menu and select Email – filling in the email that the subscriber used to join your MailChimp list.
Right below that you’ll see the First Name box, which you can fill in using the drop-down menu with the Merges Fname option. For the Lead Source box you can choose Use Custom Value and fill in something similar to what you filled in for Company, i.e., “MailChimp Subscription”. This just tells you later on that the Lead came from this Zap.
Feel free to fill in as many or as little boxes as you see fit, and hit Continue when you finish. You should see the following screen:

This page is just here to test the Zap before turning it on. Whether or not you choose to send the test or skip it is completely up to you, it doesn’t affect the final outcome. Once you finish this section up, you’ll arrive at the final page:

This means you’re almost done! All that’s left to do is name your Zap and turn it on. Once you click the Off switch in the middle of the screen, the Zap will go live, and any new MailChimp subscribers you receive will automatically become Salesforce Leads!
Conclusion
A quick recap of what we did:
- Created a mailing list in MailChimp and integrated it with our website
- Created a new Zap in Zapier that connects MailChimp to Salesforce
- Created a trigger that runs the Zap every time someone new subscribes to our MailChimp list
- Created an action that adds that new subscriber as a Lead on Salesforce
By identifying each of your new MailChimp subscribers as potential Leads, you make it easier to stay in tune with your mailing list and keep up with prospective customers. Both Salesforce and MailChimp are valuable tools for managing your customers. By combining these resources with Zapier, you strengthen your ability to secure and retain clients.
This is only a sample of what can be accomplished through Zapier. Don’t hesitate to explore what else the service has to offer, and get creative with your automations!
For this, you’re going to need a MailChimp and a Zapier account. Both are free and easy to join. You’ll also need to be at least a little familiar with your site and how to embed things in it. To incentivize people to sign up for your email list, we suggest giving away a digital good for free. This can be a PDF, video, software sample, discount code, etc. The item will be different depending on what kind of service you are trying to promote. To be able to share the file, you need to have it uploaded online somewhere that allows you to share the file using a link. If you don’t already have the file uploaded somewhere, Dropbox is another simple and free solution that will allow you to upload the file and share it through a link.
Now that that’s out of the way, let’s get into it!
Step 1: Upload Your File To Dropbox
If you already have your file/item uploaded somewhere that allows you to share it, or you’re giving away a discount code, then feel free to skip over this step.
Otherwise, go to the Dropbox website, select “Upload” and then choose “Files”. Then navigate to where those files are on your computer and upload them.

Step 2: Create A List In MailChimp
Once again, if you already have a mailing list in MailChimp, then feel free to skip over this step as well.
Create a list in MailChimp and fill in your company’s information by selecting “Create List”.

Once you’ve created your list, click on it, and then click “Signup Forms”.

After that, choose “Embedded forms”. This will provide you HTML code that you can copy and paste onto your site. Once you have copied it over, a form will appear on your webpage that allows people to subscribe to this mailing list.
Step 3: Create A New Zap In Zapier
Zapier is a website that allows you to create automatons using different services. An automation is just a series of steps that you would normally complete yourself, but instead Zapier will do it for you, saving you time, energy, and all of that other stuff you could be spending on more important things.
On the front page of Zapier is a box that says “What Do You Want to Automate Today?”.

This is where we’ll create the beginnings of your Zap (aka automation). For our purposes, you’re going to want to connect “MailChimp” to “Email by Zapier”. In the left box, type in “MailChimp” and select it when it pops up, and in the right box, type in “Email by Zapier”, selecting it as well when it pops up. Then, just click “Make a Zap!”

Step 4: Create The Trigger For Your Zap
Your Zap’s “Trigger” is just what causes it to start working. In our case, we want our Zap to run every time someone subscribes to our email list. You should see a screen that looks like this:

If “New Subscriber” isn’t selected, select it, and hit “Continue” in the blue box in the bottom right. Next it will ask you to connect your MailChimp account. Click “Connect Account” and login in the tab that it sends you to. This connects your MailChimp account to your Zapier account, so that the two sites can work together. This is what makes Zapier such a useful service.
After you’ve connected your account, click “Continue” and choose the MailChimp list that you have embedded on your website. Click “Continue” again, then click “Continue With Default Sample”, and skip any testing that it asks you to do. You’re welcome to test the Trigger if you want, but it isn’t necessary.

Step 5: Send Outbound Email
This is the step that sends an email to your new subscriber containing your free digital offer. You should be on the second step in your Zap “Send Outbound Email”. There’s only one option, “Send Outbound Email”, so leave it selected and click “Continue”.
Next we’re going to create the email that will be sent to the subscriber. For the “To” field, click the drop-down menu to the right of the field, and click the “Email” option. This will pull the email from the MailChimp trigger and send it to that address.

After you click it, you should see the field filled in with a green bubble that says “Step1: *email address*”.
Fill in the Subject and Body with whatever you like. Keep in mind that this is what your new subscriber will see in their inbox. After you finish typing in your message in the Body field, paste the link for your download. If you uploaded it to Dropbox, go to the file in Dropbox, select “Share”, “Create a link”, and then “Copy link”. Then paste this link into the body of your email.

You can fill in more fields as you like, but this is all you need to do for this step.
Step 6: Append Entry and Schedule Digest
Now we’re going to get into the steps that email you a list of your new subscribers for the week. On the left of the page, select “Add a step”. In the search bar, type in “Digest by Zapier” and click it.

Choose “Append Entry and Schedule Digest” and continue. For the “Title” field, enter something along the lines of “New Email Subscriptions This Week.” The “Entry” field is what will generate your list of subscribers. Once again, click the drop-down menu to the right of the field, and select “Email” from the first step. You can also pull in the variables containing the subscriber’s first and last name, if you want, so that you can associate a name with each subscriber. After you pull in the variables you want, type “<br/>” at the end of the line. This is HTML for creating a line break, and will make your list look like a list as opposed to a bunch of emails running together.

Set the “Frequency” to “Weekly”, the day of the week to “Saturday”, and the time to “Midnight”. Click “Continue”. As before, skip testing, and click “Continue”.
Step 7: Email The Weekly Digest To Yourself
Lastly, we’re going to create the email that will send you the list of new subscribers. Click “Add a Step”, search for “Email by Zapier” and select it. Once again, we’re going to “Send Outbound Email”.
For the “To” field, enter your email address. Label the “Subject” field whatever you would like; something like “New Email Subscribers” is perfect. In the “Body” section, select the drop-down menu, scroll down to “3 Append Entry and Schedule Digest”, click it and select “Current Digest”.

Skip testing, and click “Finish”. You’ll see a pop up asking if you’re ready to turn your Zap on. So long as you are ready to start automating this task, turn it on, and you’ll be all set!

Conclusion
To recap:
- We uploaded a free good to Dropbox
- We created an email sign up form on our website using MailChimp
- We created an automation in Zapier that connects MailChimp to Email by Zapier
- Each new subscriber will get a welcome email that includes a free downloadable good
- Each week, on Saturday at midnight, you will receive an email list containing the emails of each new subscriber for that week
This will incentivize potential customers to subscribe to your mailing list, encouraging their participation with your service. Also, by sending yourself an email list of your new subscribers, you can track your growth and effectiveness, and even send out personalized emails to subscribers if you want.
Zapier can be a great tool for growing your business. Definitely check it out and experiment with different kinds of automations. Hopefully you found this helpful as a starting resource for the site.
The post How To Keep Track Of New MailChimp Subscribers And Send Them A Free Digital Item Using Zapier And Dropbox first appeared on Fulcrum Dynamic.]]>